 I made copies of some old Christmas sheet music, distressed with walnut ink and added a sprig of greenery, twine, and jingle bell! Very easy...and elegant in a simple kind of way!
 More projects to come.....
MERRY CHRISTMAS!
I made copies of some old Christmas sheet music, distressed with walnut ink and added a sprig of greenery, twine, and jingle bell! Very easy...and elegant in a simple kind of way! More projects to come.....
MERRY CHRISTMAS!
 The only thing that is wrapped completely around the box is the twine. I didn't want to cover up too much of the strike area for lighting the matches. I think I've mentioned before how much I LOVE my Xyron sticker maker!
 I think it was a couple years ago that I went to Archiver's with my friend, Suzanne, and we made frames. Since then I've made a couple - they are really simple to make! When my oldest moved out on her own, she requested a frame and picked out the paper. Here is the end results:
 I hope it's not to frilly for her, but her sister has assured me that it is not and that Brianna will love it.
 I inked the edges of the frame with gold ink - I can't remember who makes it, but it's in the shape of a teardrop. The paper already had gold accents, kinda marble-like or crackled, but I added some more just for good measure! :) Before I added the paper to the border, I inked the edges of the paper as well.
 Hemmed & hawed about whether to use gold or pearl accents, but I'm glad I went with pearl...gives it a softer look I think.
 The flowers were sprayed with gold Glimmer Mist and swiped the edges with gold ink.

Tonight my dh had to work - someone called in sick - so I used the opportunity to play! Was able to finish a card I started last night, AND get 2 more cards done, too!!! I used 3 sketches from theVerve October Release Party.
First up: Retro Rover! Here's the sketch:


I wanted the bottom strip to look kinda like a dog collar with the tag hanging off. Hopefully that point gets across... The dog is cut out and popped, and the green portion is popped, but you can't see it too well in the pictures.
 Recipe: Latte matstack (DCWV); Retro Rovers stamp (TAC); Brilliance Starlight Silver ink, Outdoor Denim ink (CTMH); watercolor pencils, Big Bite, Gamsol.
The next 2 cards are more my style - vintage.
Sketch: My Card:
 I got this picture from Vintage Stampers Freebies! Lots of cool pictures on this blog to use for papercrafting! I love to use vintage "findings" on my crafties! Here I used a stick pin that's been sitting in my stash for quite awhile - it's about time I used it!
 The flowers were sprayed with Tattered Angels Pearl Glimmer Mist. I used a heat gun to speed up the dry time...but be careful! Don't whither the flowers (experience speaking here)! Charm and pearl button are also from my stash. I opted to leave out the journaling piece. Maybe I'll add it later when the card is needed for sending....maybe using a Nestabilities label! That would look nice! :)
  Recipe: K&Co "Hannah", CDWV matstack papers; Old Paper distress ink; Pearl Glimmer Mist.
 My card:
 I used a bit of creative license on this one...the little tab on the focal point just wouldn't work with what I had in mind, so I substituted a flower. Works for me! Lots of distressing on this one...almost wonder if it wasn't too much... But I'm happy with the end results so I'm not going to worry about it! :)
 I found an old dictionary at a garage sale this summer so I used that for the "ribbon" across the bottom. The large butterflies are popped for dimension.
 Recipe: K&Co "Ancestry paper; Vintage Postcard (CTMH), Travel (SeeD's), Postal (SeeD's), Collage Elements (SeeD's) stamps; Martha Stewart butterfly punch; "Bliss" Kaiser pearls.
 Here's my card (sorry it's so dark! Couldn't get my lighting to work right...):


 Flowers and leaves stamps are from Close To My Heart - Treasure Life set. Sentiment is from CTMH - Say It In Style.
 MORE lace...MORE pearls!!!! Can't get enough!
 I had envisioned a card with a sewing theme, and when my daughter asked, "Is that PAPER?!" I knew I had succeeded! It took me awhile to finish because I tried out my little crafty sewing machine...and it worked pretty good! But if I ever want to zig-zag I will need to pull out the big machine.


 Verve Stamps is having a new Project Parade and this month's theme is...
Encouraging Words/Friendship. So, I think this card would qualify as encouraging, don't you? Check out the Verve Project Day Challenge!
Paper is from the new fall stack Indian Summer from DCWV. There are some beautiful papers in that stack!!! Before I stitched the pieces together, I distressed the edges of the paper with the edge of my scissors, rolling portions to get that worn fabric look. Also used my Worn Paper Distress Ink on the sides and swiped it across the fronts of each rectangle. Everything else is from my scraps / pieces parts.

Front of card:
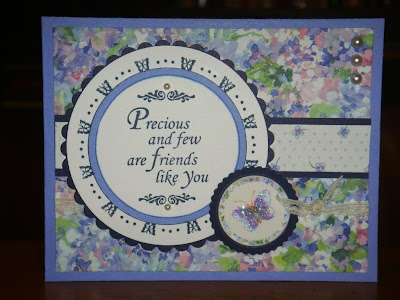
I changed the length of the strips accross the front (you can hardly see the thin lace in the picture), and put the pearl accents in the upper corner instead.

The center of the large circle is popped up, as well as the small circle with the butterfly on it depth. Also added glitter to the transparent butterfly sticker.
The paper is actually a scrapbook page kit that I found at the Dollar Store a couple years ago. Love the colors and the stickers! Don't know why it took me so long to use this stuff! The friend sentiment stamp is from the See-D's Victorian Flourishes set.
If you're reading this, Kim, I hope you had a wonderful birthday and that you are enjoying your vacation!
Thanks for stopping by! Have a fantastic day!

 The Fun Fur has beads on the ends...not much...just enough to add some weight to keep it hanging straight.
 Inside the front cover is a frame die-cut from my stash with a flat metal heart in the center. I didn't want to have too much inside here so it won't interfere with writing in the journal. You can't see it well in the picture, but I sponged Staz-On black, purple and blue ink onto a piece of Denim cardstock (CTMH) to coordinate with the front paper. REALLY like how that turned out - sort of a soft marble look.
 One more thing to scratch off my To Do list! Thanks for stopping by today! Have a great weekend!

 You can't tell, but the background DP has crosses on it. I was kinda bummed that they got covered up, but that's ok. Yesterday I picked up some Brilliance metalic inks at Michael's & used the copper one for the stamped cross. You can click on the pictures to enlarge to see the metallic effect of the ink. The swirly flowers on the sides of the cross are from the Close To My Heart stamp set "Adorable."












